How to transfer embroidery pattern to fabric???
What is the easiest and the best way to transfer embroidery
patterns to your fabric?
Hi:
Here are four ways I know of :
1. Scan and print it to a piece of Iron-on T- shirt Transfer paper. Following the directions on the Transfer paper. Using a hot steam iron transfer the design to the fabric and peel the backing off being careful to not pull the design off it – A Note of Caution : Do this with only Cotton or Linen Cloth – (Do not use rayon or synthetics they will burn or melt ; if you try this method with them)
2) Scan and print a copy of it on a sheet of paper secure it on the fabric with quilting or dress pins as long as it there are not on the pattern lines Than start cross stitching from the center of the pattern working you way out toward the outside of the drawing pattern when your done cross stitching Than wash the pattern to remove the paper- this is the easy way I know how to do this without doing # 1. above.
3. Draw a grid on both the pattern and the fabric – make sure the grids are identical except that they are proportionally larger or smaller depending on the design. Then draw your picture on the fabric until it look like what on the pattern grid only the fabric drawing of it will be proportionally larger or smaller
4. Do a free hand the drawing on the fabric if your design is simple or use tracing paper to trace out the key design elements Number it – put some marks or lines so you can originate your pattern pieces with one other. Secure it on the fabric with quilting or dress pins. Do your cross stitching over it .Or you can transfer your drawing from the patterns on the tracing paper with a fabric pen or pencil. (Be careful with fabric marker pens – you can not ease them as easily as you can pencil marks). putting your orgination marks on so you can match the other pattern pieces with it and draw them in as well – remove your pattern pieces when your done drawing it. Do your cross stitching on it. and your done
Hope this helps
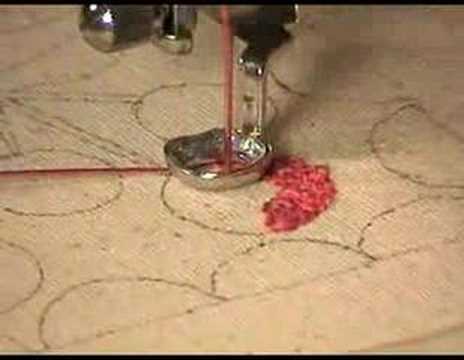 Make a miniature rug on the sewing machine with thread painting which mimics Russian needlepunch. Variegated threads give a lovely blended look similar to wool hooked rugs. The threads used are YLI cotton machine quilting threads. Part 1
 beautiful heirloom sewing
 Adding automatic Satin Stitch outlines to Digitized Fonts, including vectorization of multiple segments prior to applying auto outline (ART-D65 v9.xx).
 Free Motion Embroidery / Thread Painting on any sewing machine. Everyone at any skill level can embroider on ALL sewing machines because we only use a straight stitch and NO sewing machine Foot is needed so visibility is far superior to any other embroidery process. This kit includes 3 8 sided frames varying in size that have holes on all 8 sides where a handle drops into to make it so you don’t have to hold onto the frames. It is ergonomic and feels like you’re holding a crayon and coloring in a coloring book. So simple even beginners succeed! It’s fun and relaxing and is a fantastic stress reducer. Invented by Clare Rowley, inventor of the Creative Feet presser feet for sewing machines and are available for purchase from http://www.creativefeet.com/products/frames/octi-hoop
 DVD Title: Creative Machine Embroidery with Alison Holt
 Embroidery software educator Soni Grint shows highlights of the packages contained in 4D Professional. She shows a jacket embellished with Shapes, a table runner created with Encore and lettering font samples including QuickFonts created from computer TrueType fonts, all in 4D Embroidery Extra. Another jacket demonstrates editing features from 4D Stitch Editor, as do morphing samples. A sampler, designs and text were created in 4D Cross Stitcher.
 In this instructional video, we show you how to use the BERNINA Embroidery Software Version 6 to modify an existing embroidery design in a number of ways with the ‘Morphing Effect’ function. Eight different morphing options are available for your use at the click of a mouse: Pinch, Ripple, Skew Horizontal, Wave Horizontal, Punch, Twirl, Skew Vertical and Wave Vertical. Using these morphing effects allows to modify designs as desired. In our example we’ve changed a butterfly design using the morphing effects “punch” and “twirl factor”. For more information about BERNINA Embroidery Software Version 6 check out the other parts of the online tutorial or visit us at http://www.bernina.com
Recent Comments